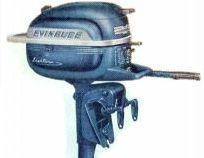
The motor for this project is Model 3303S Serial B 18010.
This is the same model motor my Grandfather had when I was a boy. I had many fond memories of this motor and wanted one to restore for years. Finally, a friend gave this motor to me because he is getting too old to use it. He knew by my reaction when I first saw it that I would fix it up, so that will run well and put it to good use. This motor had been stored with gas still in the tank for two or three years. I did get it to sputter to life, even with the old gas, but I realized that it would need a good tune-up. It was also leaking gas from the carburetor. I believe that when I am finished tuning up this motor, it will run every bit as well as it did when it was new. You can buy these motors for around $150 to $200 on e-Bay. If are willing to buy around $100 in parts, you can tune it up and have it running like new. Without the parts for the tune-up, it will never run right for reasons I will describe as I document this procedure.
The helpful people at the iboats.com boating forums provided the following information about this motor.
Evinrude model 3302:
Year: 1963
HP: 3
WOT RPMS: 4000
Displacement: 5.28 cu.in. = 86.5 ccm
Weight: 34 lbs. = 15.4 Kg
Gear ratio: 17:28
Spark Plugs: Champion J6C gapped at .030" (J6J is no longer available)
Lower unit oil: OMC/BRP 'HiVis' or equivalent 80/90W outboard gearcase oil from Walmart, etc.
Fuel/Oil mix: 24:1 87 octane gas to TC-W3 outboard oil (forget about SAE 30w).
Time to get Started - If you have gas in the tank, you might as well go ahead and try to start your motor. There is not much point in this except to get a feeling for how much things improved when you are done. Before you start it up, stick the lower unit in a garbage can full of water. Note how well the motor turns over and if the recoil starter is working. Also, note if the motor seems to have good compression. Inspect the rope and handle to see if they need to be replaced.
As I disassemble this motor, I plan to clean up everything I can with a cloth and spray cleaner. There are many special cleaners available for this, but I am simply using common household cleaner which I found under the sink. Hopefully, I will return it before my wife discovers it missing. I also plan to keep these parts organized as I take them apart.
Take off the Motor Covers - CLICK HERE for details.
The major areas that we will focus on are Powerhead, Fuel/Carburetor, Ignition, Impeller and Lower Unit Lubricant.
Power Head - Before you decide to tune-up your motor, you want to make sure that the motor will turn over and you have compression with both cylinders. If the motor will not turn over by turning the flywheel or it does not seem to have compression, then your motor needs more than a simple tune-up. You will have to decide how badly you want to fix your motor and how far your mechanical ability will take you. A tune-up is fairly easy. Freeing pistons and restoring compression is more on the medium level of difficulty and beyond the scope of this article. I do not want to say that the motor cannot be fixed or is not worth fixing but with the motor that I am using for this article, it is not necessary. In another article, I did have to free the pistons on a Johnson 15 HP motor and give it a new life. You can get a compression gauge at your local auto parts store for around $20 or $30.
You may want to replace the starter rope and the starter rope handle. It is also possible to replace the starter recoil spring if necessary. All these parts are still available but were not necessary for this project.
Carburetor - Anytime you have an old motor that sat around for a while, you can assume that the carburetor needs service. Gas, especially when mixed with oil will turn to varnish or otherwise gum up your carburetor. While there are many carburetor cleaning additives that you can put in your fuel tank or spray directly into the carburetor, they will not come close to accomplishing the same thing as a carburetor tune-up. Even if the motor was stored without fuel in the carburetor, the gaskets may dry out and crack or quickly deteriorate once you try to use it again. The only way to make sure the carburetor is going to function well is to remove, disassemble, clean, and reassemble with new parts, replace, and make adjustments which are the steps to performing a carburetor tune-up. CLICK HERE for detailed photographs and procedures for performing the carburetor tune-up for this motor.
Ignition System - With the exception of the spark plugs and plug wires, all of the ignition system is located under the flywheel. The type of magneto ignition on this motor is Flywheel Magneto with Breaker Points. The job of the ignition system is to generate enough voltage (around 20,000 volts) to jump the gap on the spark plugs creating a spark and and igniting the fuel/air mixture, and to make sure that voltage is delivered to the spark plug with exactly the right timing CLICK HERE for detailed photographs and procedures for performing the ignition system tune-up for this motor.
Impeller and Lower Unit -
Tank Testing - While not exactly a test tank, I did fill up a 55-gallon barrel, hang the motor on edge and fire it up. You do not want to run the motor out of the water at all, and there is no good way to put ear muffs on this motor, so it has to be tested either on a boat in a body of water or some tank. I am glad I did not try this out in a lake because the motor did have some problems that needed to be addressed. It turned out that water was not circulating around the cylinders because the motor would get hot after about a minute of running and I had to shut it down before it would become damaged. This overheating problem was not immediately obvious because water was spraying out of the small outlet ports in the lower unit. When I suspected that the motor was running hot, I splashed some water on the cylinder head, and it immediately began to sizzle and turned to steam. This meant that the head was at least 212 degrees Fahrenheit when it should be at around 150 degrees Fahrenheit while running. While disappointed, I was glad that I had the wisdom to shut the motor down and let it cool off before attempting to start and run it again it again.
Fixing Overheating Problems with Cooling System - Up to this point, I had not pulled the cylinder head because the motor would turn over and seemed to have good compression. With the motor overheating, it was obvious that I would have to dig deeper to find out why water was not circulating through the power head. Please click here to read about the details of this procedure.
More Tank Testing - After going back and fixing the problems with the cooling system, it is time to do some tank testing again. My tank consisted of a simple 55-gallon barrel. The repair shops will have much larger test tanks. They will also have test props to put a load on the motor without turning up the water too much. Since this is a small motor, I went ahead and left the prop on and fired up the motor in the water barrel. My first concern was to see if the motor would overheat and to my relief, it did not. At first, the motor did not seem to run consistently as is coughed and sputtered and created a huge cloud of blue smoke. I then realized that although I cleaned the gas tank, there were probably some particles getting into the carburetor. After running the motor for a while, I pulled the carburetor bowl and low-speed jet and cleaned them. I repeated this process several times. It seemed that the vibration of the motor running was knocking all the crud loose. This motor had not been run in at least 10 or 12 years so there was lots of crud in the tank and fuel lines. I had dreams of the motor starting on the first pull and running perfectly after the tune up but in reality, it had to be run for a while before it would start to act like a good boat motor again. The longer the motor ran, the better it seemed to do as if it were being broken in. A 55-gallon barrel is not ideal for testing because the motor will cause quite a torrent when it is running fast. Also, the currents in the water caused the motor to speed up and slow down. I attempted to adjust the carburetor and make the motor idle but this is best done on a lake somewhere. I ran a couple tanks of fuel through the motor and basically let it sit there and run for 3 or 4 hours while I cleaned up my work area. I was concerned that the motor did not run perfectly in the tank but I was assured by a friend that the motor would behave much better once it was on a boat and in an open body of water, and as it turned out, he was right. When I finally reached the point where I could get out on a lake with this motor, I was quite happy with the way it performed. I've had this motor out several times now and it runs great. I get a lot of compliments from people who admire this 42-year-old motor that I brought back to life. I look forward to working on and writing about more motors in the future.
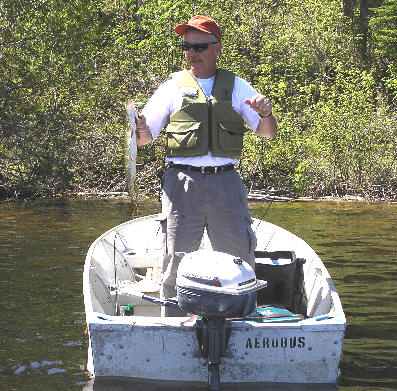
Take the Motor Fishing - It was February 27, 2009, in Indiana but I just could not wait. I took my Evinrude Lightwin to Turtle Creek Reservoir just south to Tere Haute Indiana to test it out. Turtle Creek Reservoir is warmed by a coal-fired power generating plant. Read the following article to find out how my fishing trip went and how my motor ran.
Enjoying the Motor - Now that I have this motor tuned up and running well, I've been enjoying it. It is now May 10 and I've had this motor out 4 or 5 times. Every time I use it, it seems to run better and better. Last weekend, on Mothers Day, our family had a gathering at my sister's place which is on a good sized lake. I brought along my small fishing boat which was a 15' Gheene Classic. This boat is like a larger fiberglass canoe with a square back for a boat motor. I have run as much as 25 HP on this boat but I stuck my little 3 HP Evinrude Lightwin on there with the idea of teaching my 8-year-old son and 9-year-old cousin how to run the thing. After a few pointers, I turned the boys loose and they ran all over the lake until their hearts were content. I stayed within sight of them in another boat and the 25 HP motor but the boys did fine on their own. With just the boys in the boat and now much else, the boat moved along at about 8 MPH. They were even able to start the motor themselves. The motor was reliable and after the initial startup would restart anytime on the first pull. I am quite happy with this little motor which will give many more years of use and memories. I plan to take it with me as a spare or something for the boys to play with on a fishing trip up in Canada later this month. It is now time to turn my attention to the other motors I have here which need to be fixed up and documented.
Fishing in Canada