Click Here to Shop eBay for Evinrude/Johnson Dual Fuel Lines and Tanks
A Warning About Pressurized Gasoline Fuel Tanks Used On Older OMC Motors
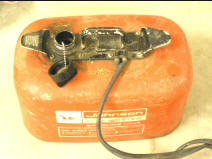
These motors use pressurized fuel tanks, known as Cruis-a-Day Tanks. Rather than sucking fuel from the tank, the dual line hose pumps air into the tank, pressurizing it to 4-7 PSI which forces fuel back to the motor. Basically, these pressurized tanks are an extremely dangerous fire or explosion danger. OMC finally stopped using these tanks after 1959..
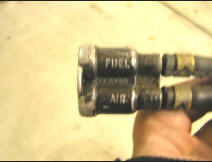
You can tell if you have one of these tanks because the hose will have two lines, one to pump air into the fuel tank, and the other to deliver fuel to the motor. This type of tank was the first exterior fuel tank that OMC came out with and was new technology in its day. Once the problems were identified, boat motor manufacturers switched to a single line fuel suction system which is much safer.
|
|
|
|
Problems with Pressurized Fuel Tanks:
-
Gasoline and Gas Vapor under pressure is nothing less than a bomb!
-
It is difficult to get these tanks to seal properly, even when new. If the tanks leaks, gas and oil will escape into your boat and into the air.
-
Leaky tanks also lose needed pressure to deliver fuel up the long hose back to the motor.
-
If you have a scored cylinder, these motors could sneeze (fire within the block) and force pressure down the fuel line and into the tank. This has been known to cause the caps to blow off the thank and shoot up 20 feet into the air! This sneezing can also ignite your fuel tank. This has also been known to cause fuel lines to rupture.
-
If you are out on the water and your tank fails to hold pressure, the only way to run your motor is to hold the tank up above the level of the carburetor and let fuel gravity feed to the motor.
-
These tanks were not simple to operate. You have to pressurize the tank with a hand pump before you can start your motor. You also have to depressurize the tank before taking the cap off.
If you have one of these old pressure tanks, chances are it will need some maintenance in order to function properly. There are kits available to repair the gaskets and seals on these tanks which can still be bought today. You need to make the decision to either repair your existing tank or convert to the type of fuel pump and line that OMC uses today.
The following procedure tells how you can your motor to a more conventional fuel pump, line, and tank which will be safer and more reliable.
Converting from Two Line Pressure Tank System to Single Line Fuel Pump Suction Tank System
The process for making this conversion is fairly simple, especially if you already have your carburetor removed for tune up. The materials you will need include the following:
-
About 6 feet of vacuum line hose, available at any auto parts store.
-
Mikumi Single Carburetor Pump
-
Vacuum Line Cap
-
3 or 4 Zip Ties
-
Single Line Fuel Connector
-
Single Line Gas Tank and Hose
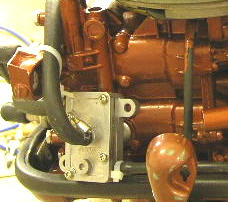
Mikumi is a Japanese company that has been around for years making carburetors and fuel pumps. You will see a lot of their fuel pumps used on go-carts, ultra-light aircraft, and many other applications involving small engines. This fuel pump can be found at just about any go-cart shop. I bought this one on-line for around $22.00. Most fuel pumps for small Evinrude and Johnson motors mount directly to the crankcase. In the case of this 5.5 HP motor, there is no place to mount the fuel pump. Larger motors such as the 7.5, 10, or 18 HP con have a stock OMC fuel pump added.
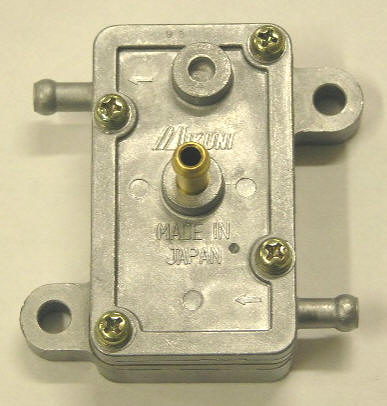
This fuel pump operates by vacuum pulse that it gets from the motor. This vacuum is generated by the motor and delivered to the pump through a hose attached to the center connector on the pump. The other two connectors are for lines going to the gas tank or fuel connector (arrow pointing in) and to the line going to the carburetor (arrow pointing out).
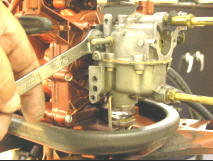
Remove the Carburetor CLICK HERE. to see instructions on removing the carburetor.
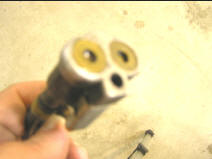
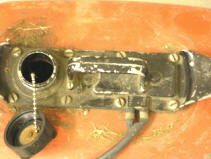
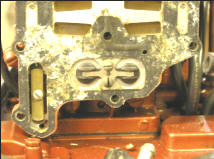
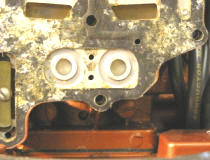
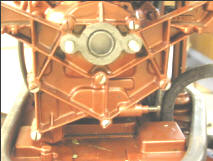
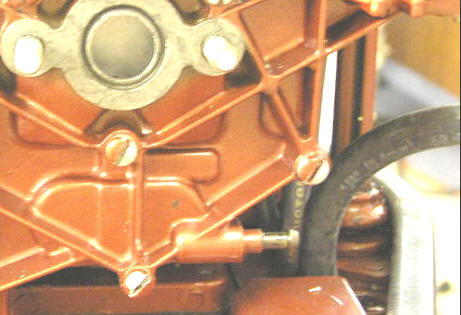
If you remove the intake manifold cover, located behind the carburetor, you will see two holes with rubber flaps over them. The flaps are check valves which air to travel outward from the crankcase. This creates a positive air pressure to travel down one of the lines of the dual fuel line to pressurize the tank. Remove the two screws holding the spring and check valves. One of these holes goes to each crankcase chamber on our two cycle motor.
|
|
|
|
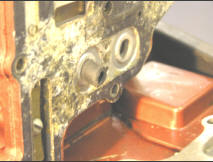
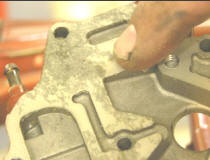
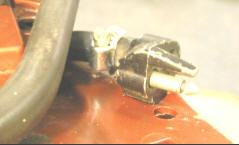
In order to get a pulse vacuum, plug up one of the holes with the tip of a vacuum line plug. Trim the length of the vacuum line plug so that The intake manifold cover will hold the plug in place so that it may not fall out of position. Replace the intake manifold cover.
 |
 |
 |
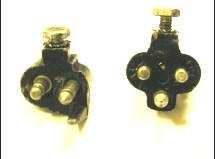
Replace the old dual fuel line connector with a newer single line fuel connector. I was able to get a single line fuel connector at my local boat salvage yard for around $6.00 but they are also available from OMC parts dealers. Pictured below you can see the old and new fuel connectors. The new connector (on the left) has only two prongs. Attach 2 feet of vacuum line to the connector on the intake manifold cover.
 |
 |
 |
Remove the two old lines going through the tiller arm base to the fuel line connector and replace with a single line which will go from the fuel connector to the new fuel pump. Allow about 2 feet of line to route around to the fuel pump.
Replace the Carburetor CLICK HERE. to see instructions on installing the carburetor. Attach 2 feet of vacuum line to the carburetor to be routed around to the fuel pump.
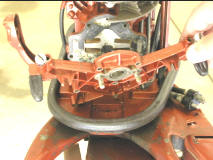
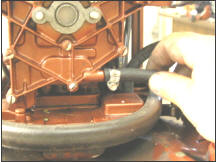
Route your vacuum pulse line, carburetor line, and fuel connector line around to the fuel pump which I place behind the hear shift lever up next to the crankcase. Trim any excess length form the lines and connect to the fuel pump. When routing these lines, keep them way from any moving parts, or linkages. The cowling should just fit over your new fuel pump. Use zip ties to secure the lines so they will stay in place.
Your motor is now converted and you are ready to use your new gas tank and fuel line.